When Texture Leads the Way – A Serendipitous Mirror Project

Textured Mirrors Born from a Happy Accident
Sometimes, the most satisfying projects are the ones that happen… by accident. And that’s exactly how this one came to life. I wasn’t planning on creating a new series of decorations — I just wanted to test a certain texture, play around with the form, and see how paper pulp would react to long, narrow tools. But suddenly, the end result brought me so much joy that I couldn’t help but take it further. I love when something just leads the way on its own, when intuition becomes the main guide. This project had exactly that kind of freedom that makes the creative process so enjoyable.
An Experiment That Brought Me So Much Joy
Honestly, I didn’t expect this experiment to bring me so much joy. At first, I used ordinary brushes, then I grabbed some thin metal skewers from the grill that I just happened to have lying around. It turned out that these unexpected tools were the key to creating the most interesting texture — something that looks a bit like seashells, a bit like coral or cracked dry earth. I love that moment when paper stops being just paper and starts to resemble something organic, almost like it came straight from nature. Each stroke, each line formed something completely unplanned yet somehow cohesive.
From Mirror Frames to Who Knows What Else
It got me thinking — how many different things could I make using this technique? The mirror was the first step, because it’s always a good way to test proportions and detail. But honestly, this texture could be used for photo frames, wall art, coasters, vases, or even lamp casings. The pattern is strong and distinctive enough to become a signature across a whole collection — one that combines functionality with bold, sculptural form. I already have a few sketches and ideas waiting to be explored — and I have a feeling this is just the beginning.
Naturally-Colored, But Full of Potential
As usual, I’m showing this piece in its natural paper pulp tones — no dyes, no paints, just raw, uneven beauty. But I know this kind of texture is just begging for color experiments. Painted white? A muted blue? Maybe even golden edges? I’m sure many variations would look stunning — and each would suit a different kind of interior. I’d love to try more contrasting versions at some point, maybe even with a bit of shine or layered patina. Sometimes one shade can completely transform the character of an object, while still preserving its original soul.
FULL VIDEO BELOW:

IF YOU’D LIKE TO SEE HOW I COVERED THE BACK OF THE MIRROR, PLEASE CHECK OUT THE VIDEO BELOW.
PAPER PULP RECIPE BELOW:

Step 1: Cut out your paper pattern
First, we need to create a paper pattern that will help define the shape of our frame. This is the moment to decide on the size and overall form of your piece. The example in the photo shows a small frame, but you can easily make a larger one — it all depends on the tools you'll be using to create the texture. In this case, I used brush handles, so their length naturally limits the size of the frame.
To make your pattern, I recommend using old newspapers or printed paper instead of clean sheets — it's a small way to create more sustainably and give discarded paper a second life.

Step 2: Roll out the paper pulp
The next step is preparing a flat surface using paper pulp. You can find the recipe and method for making the pulp in [the earlier post/video – link above]. The easiest way to work with the pulp is to roll it out between two layers of plastic film — I like using thin cellophane, like the kind used for wrapping flowers. This prevents the pulp from sticking to your rolling pin and work surface.
Roll it out to a thickness of about 5–8 mm, making sure the flattened area is slightly larger than your paper pattern. This extra space will help with shaping the frame later on.

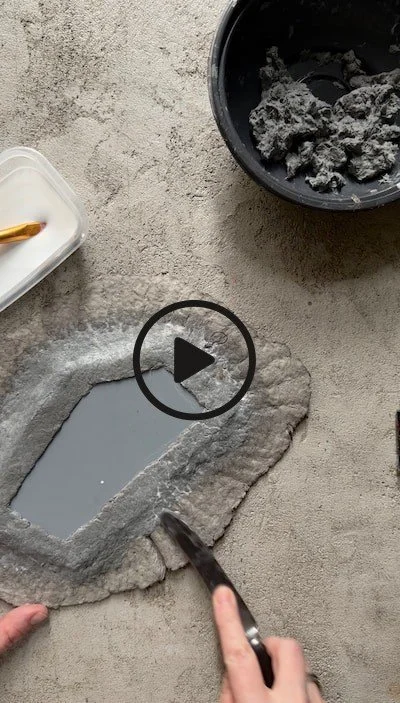
Step 3: Trim the excess pulp using your paper pattern
Once the paper pulp is rolled out and roughly matches the size of your pattern, it’s time to shape it more precisely. Place the paper pattern directly on top and use it as a guide. Then, using a sharp-pointed knife, carefully cut away the excess pulp — both around the outer edge and the inner opening.
After cutting out the shape, it's time to refine the details. Use a knife with a rounded tip to gently smooth all the edges, both outer and inner. This kind of knife allows for precise but soft movements that won’t damage the moist pulp.
This step not only improves the overall look but also makes it easier to apply texture later on.

Step 5: Start adding texture
This is definitely the most fun and creative part! To create the texture, I used two long paintbrushes, or more precisely — their wooden handles. I gently pinched the pulp between the two handles, creating a subtle but defined impression.
This technique allows you to form a rhythm or pattern — the direction, depth, and spacing depend entirely on your tools and your hand. Don’t be afraid to experiment!

You can also use a single brush handle to press lines into the paper pulp one by one. This allows you to create clean, controlled impressions, forming a texture that follows the edge of the frame or a pattern of your own.
This method gives you full control over the look — you decide how dense, deep, or directional the lines are. Wooden brush handles work great, but feel free to experiment with other similar tools too.

Step 7: Let it partially dry, then smooth the surface
Once you’ve finished the full decorative texture, set the piece aside for a few hours to partially dry. The pulp should firm up slightly but not be completely dry — this makes it easier to refine the surface without damaging the shape.
Next, use a soft brush and some PVA glue to smooth everything out. Gently brush over the entire surface, paying special attention to any uneven areas. This step helps even out the texture and leaves the whole frame looking more polished and cohesive.

Step 8: Dry the other side – and you’re done!
Once the top side is fully dry, gently transfer the frame onto a cotton cloth to let the underside dry evenly. Make sure it lays flat and that no moisture is trapped underneath.
And that’s it! Now you can glue in a mirror, add a glass cover, or place a photograph. The final use is entirely up to you – let your creativity guide the finishing touch.

